The projects I completed tonight were identical and were based on a project I have actually made several times previously. My son, like most small kids, is obsessed with tags. Give him any plush toy and he will immediately locate and begin to twist the tag. He loves them and has for quite a while. One of his teachers at daycare mentioned that you could buy a toy that was nothing but tags online but after I looked them up, I couldn't bring myself to pay what I considered an exorbitant amount of money for less than $3 worth of materials. Additionally, their printed ribbons were wicked tacky. The basic small blanket ringed with ribbons seemed like an easy project so I used some of the "minky" fabric (I loathe that word, but it is the most recognized description of this fabric) I had on hand plus some brightly colored quilting cotton I bought with a coupon at Jo-Ann. (Aside: I never shop at Jo-Ann or Michaels or any of those similar stores without coupons - 40% off is the bomb, people.) I also used part of my large stash of ribbon and some additional ribbon I got at a local craft store (Playtime, for any Arlington peeps - they have a great ribbon selection, btw). Below I describe my method for making the small blanket. You can easily churn this out in an hour or less if you have all the necessary materials on hand.
1. Cut two equal sized squares from a minky fabric (or any soft textured fabric, really, as long as it would be comfortable for little hands to explore) and a quilting weight cotton (I will sometimes use more than one cotton fabric and create a quilting square to mix colors and patterns). For the small blanket I use a 12-14 inch square, which is small enough for baby hands to carry and large enough to showcase most fabric patterns. I am not terribly particular about my final measurements, but if you are, read through the directions and do the appropriate math to account for seam allowances.
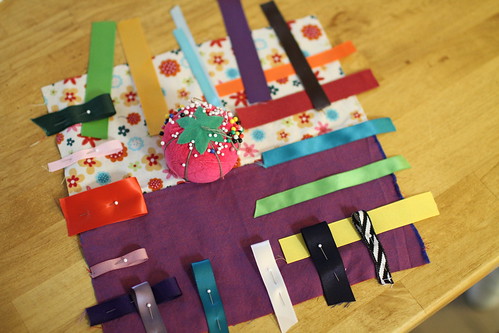
2. Cut 4 inch lengths of ribbon and lay them out at regular intervals along the perimeter of the right side of your quilting cotton until the arrangement is pleasing to you. I typically do 4 to 5 ribbons per side and try to make sure that the colors are evenly distributed. If you are using a cotton fabric with a regular pattern it is nice to line up the ribbons with the pattern.
3. Once you have a pleasing layout for the ribbons, fold each ribbon in half to create a loop and pin the loop to the previously chosen location on the right side of your quilting cotton. The ends of the loop should overhang the edge of the fabric by about 1/4 of an inch. See the picture below for an illustration. Continue pinning the ribbons in this way until all ribbons are attached to the cotton, making sure that the ends of the loops are pointing away from the center of the fabric.
4. Stitch all the way around the perimeter of the quilting cotton with a 1/4 inch seam allowance. This will attach the ribbon loops to your fabric and eliminate the need for pins to hold the loops in place in the next step.
5. Place your minky square and your cotton square right sides together and pin around the perimeter. Make sure that your ribbons (which should be securely attached to your quilting cotton - did you do step 4?) are tucked neatly inside so that you don't have to pick out a ton of freaking stitches after you accidentally sew part of a ribbon loop into the edge.
6. Sew around the perimeter of the fabric sandwich with a 1/2 inch seam allowance, leaving a 2 inch opening in the middle of one side. I like to sew with the cotton on top, because I think my machine sews it better that way, but either way you align it make sure that you are catching both fabrics and all ribbon ends in your stitching and that you leave a 2 inch opening on one side to enable turning the blanket right-side-out. I mark the area I'm not going to sew with two closely spaced pins so that I don't forget. Back-stitch on both sides of the opening to protect your stitches during the turning process.
7. Clip your corners, being careful not to cut through your stitching. Even up any rough edges and cut off any overhanging ribbon edges (or don't...all of this will be encased in the blanket and won't show, so if you don't feel like doing this step, it is a-ok with me). Turn your blanket right side out and use a pointed object to push out the corners. I use a metal chop stick. Pin the area around the hole to close the blanket.
8. Top stitch all the way around the blanket with a matching or contrasting thread, depending on your desired look. Make sure that the top stitching completely closes the hole you left for turning and tug all ribbons to ensure that they are securely attached. Remember, this is for a baby!
The nice thing about these blankets is that they are super portable and lightweight and the ribbon loops give you tons of places to secure a toy strap, making it harder for your little one to Hans Gruber* it. I have given several of these as gifts and made a couple for my little guy and they seem to go over well. They are easy to customize to individual color preferences and washable to boot. The Numa's current favorite toy is a dinosaur with ribbons for spikes (named Bacon...my son is so cool), so one of my future projects will be a plush toy with ribbons.
**If anyone does read this and use the tutorial, please know that the manufacturers of the original product in no way contributed to this tutorial and they do not authorize anyone to use this tutorial to sell this or similar products. From what I understand, they don't look too kindly on that sort of thing either. So, don't use this to sell these things, k? Personal use only.**
*When the Numa was a baby, he would randomly drop or sometimes throw things on the floor, which my husband and I started referring to as Hans Grubering. You know, like when John McClane throws Hans Gruber (oh, Alan Rickman, how I love you) off the roof in the first Die Hard? Anyway, it stuck and now we use it for anytime someone throws something onto the ground. Stick around, people. It's going to be a thing. And these pretzels are making me thirsty. I clearly need to go to sleep.
Happy Weekend!
Be well,
Me
(This was originally posted on July 30, 2011 but I am re-posting to move to the top of the blog.)
No comments:
Post a Comment